
How to Separate an Image from its Background
I’ve seen people try to separate an image from its background by using the Pencil tool, by playing with the Magic Wand, and even by trying to draw an outline with the Lasso tool.
The main difficulty with trying to separate an image from its background is that there are pixels which cover an area of the picture which is partly foreground and partly background. With any of the aforementioned methods, you have to declare whether a pixel is either foreground or background, even though it may be both.
Believe it or not, there is a way that you can cut pixels in half. In Photoshop, the way it works is that if you cut a pixel in half, you’ll have the same pixel, but it will be 50% transparent, so it will be affected by what colour you put under it, just like the difference between coloured paper and cellophane.

1 – The original image
 Select the Freeform Pen tool from the Toolbox (click and hold down on the pen tool if it’s not immediately visible.)
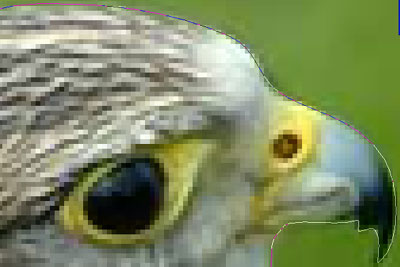
2 – Creating a Path
Use the Freeform Pen to draw a rough outline around the object. (Make sure you have the “Paths” option at the top left of the screen selected.) Generally err on the side of cutting into the image rather than leaving a gap.Use Ctrl+Click to manipulate the points, and drag their “arms” around to change the curve. To insert a new point, just click on the line.
When you’ve finished, right-click the line, and click Make Selection. This turns your line into a selection.

3 – Removing the background
Cut out your object and paste it into a new layer. (Ctrl+C, then Ctrl+V) You can then replace your background layer with whatever you want.
I’ve put in this magenta (opposite of green) background to show up any green bits that might still be stuck to our budgie.
Notice there are no jaggy edges, and there is no visible green outline.